Video | . Algorithm: How to select skin biopsy technique, site and transport media |
CLINICAL
Overview
Performing a skin biopsy is a simple skill that once learned, can greatly help with the diagnosis of chronic wounds. A number of wounds are misdiagnosed every year, leading to delayed treatment.[1][2] To promote wound healing, the underlying cause(s) of a wound must be correctly identified so that an accurate diagnosis can be made and an effective treatment plan can be implemented. A biopsy should be performed on any ulcer that is not healing at the expected rate, in order to uncover an undiagnosed cause or an additional etiology.[1]
Clinicians might be reluctant to perform biopsies due to insufficient clinical experience in performing the procedure, lack of equipment, or concerns regarding potential complications such as infection, uncontrolled bleeding or delayed healing.[1][3][4] However, skin biopsies have been shown to be a safe procedure that does not delay overall healing of the chronic wound.[3]
This topic provides an overview of the different available techniques for wound biopsy, along with a step-by-step protocol for conducting a punch biopsy. For a review on when to collect a specimen for wound C&S and comparison of specimen collection methods (i.e. wound swab, tissue biopsy and needle aspiration), see topic "Wound Culture - Swabs, Biopsies, Needle Aspiration". For step-by-step instructions on how to collect a wound swab see topic "How to Collect a Wound Swab (Levine Technique) for Culture".
Background
Definitions
- Wound biopsy: wound biopsy is a procedure to obtain tissue (often skin) from the wound for diagnostic histopathological examination and/or culture and susceptibility studies (C&S).
Types of skin biopsy
According to the American Medical Association Current Procedural Terminology (AMA CPT) Codebook guidelines, there are three distinct techniques for skin biopsies: tangential, punch and incisional biopsies.[5][6]
- Tangential biopsy (CPT codes 11102–11103): tangential biopsy is a skin biopsy performed with a sharp blade, such as a flexible biopsy blade, obliquely oriented scalpel or curette to remove a sample of epidermal tissue with or without portions of underlying dermis (Figure 1). These are not considered excisional biopsies, which remove the entire lesion with margins. Tangential biopsy technique may be represented by a superficial sample and does not involve the full thickness of the dermis, which could result in portions of the lesion remaining in the deeper layers of the dermis.[5]
- Punch biopsy (CPT codes 11104–11105): a punch biopsy uses a punch tool to remove a full-thickness cylindrical sample of the skin (Figure 2). Simple closure of the defect is included in the service. Manipulation of the biopsy defect to improve wound approximation is included in simple closure. For a video and protocol on how to collect a punch biopsy, see sections 'Procedure: Punch Biopsy of a Wound' and 'Video'.
- Incisional biopsy (CPT codes 11106–11107): an incisional biopsy requires use of a sharp blade to remove a full-thickness sample of tissue via a vertical incision or wedge, penetrating deep to the dermis and into the subcutaneous space (Figure 3). This method may sample subcutaneous fat. Although closure is usually performed on incisional biopsies, simple closure is not separately reported.
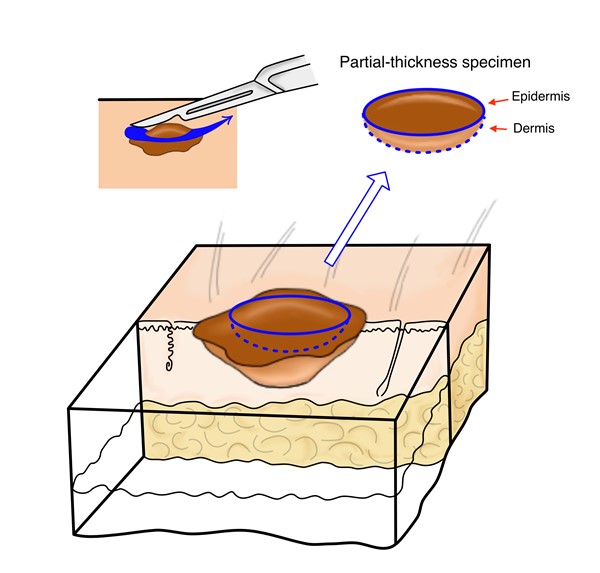
Fig. 1. Tangential biopsy | 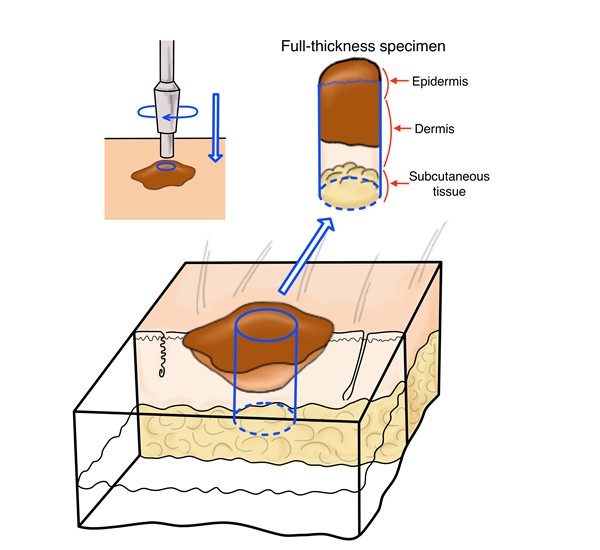
Fig. 2. Punch biopsy | 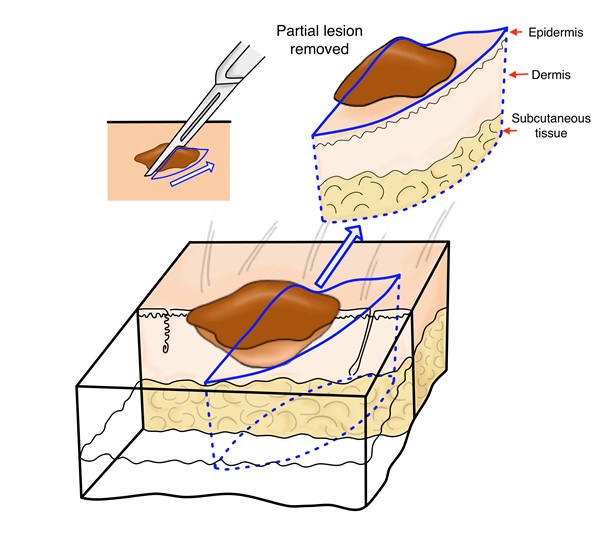
Fig. 3. Incisional biopsy |
Of note, the AMA CPT Codebook also lists shaving of epidermal/dermal lesions and excision of lesions. For these procedures, the removed tissue may be submitted for histopathological analysis however the primary intent is to remove the lesions and not to collect a specimen for diagnostic histopathologic examination like the biopsy codes above.
- Shaving of epidermal or dermal lesions (CPT 11300-11313): shaving is the sharp removal by transverse incision or horizontal slicing to remove epidermal and dermal lesions without a full-thickness dermal excision. This includes local anesthesia, chemical or electrocauterization of the wound. The wound does not require suture closure.
- Excision of lesion (CPT 11400 and 11600 series): excision is defined as full-thickness (through the dermis) removal of a lesion (benign or malignant), including margins, and includes simple (non-layered) closure when performed.
Types of bone biopsy
The AMA CPT Codebook guidelines list two methods for bone biopsy that are more likely to be utilized by wound care clinicians [5]:
- Biopsy with a trocar, or needle (codes 20220 and 20225)
- Open biopsy (codes 20240 and 20245)
Types of InvestigationS
- Histopathology: histopathology is the diagnosis and study of diseases of the tissues. It involves interpretation of the skin under the microscope, generally employing hematoxylin and eosin (H&E) staining. It is the main study of skin biopsy and helpful in inflammatory, neoplastic and structural pathology.[2]
- Direct immunofluorescence: direct immunofluorescence involves the application of fluorophore-antibody complexes, which bind to specific antigens present within specific dermatoses. It is useful in detecting selected autoimmune blistering diseases, vasculitis, and genetic diseases that are expressed as skin conditions (genodermatoses).[2]
- Wound culture: wound cultures are laboratory tests to determine the type and quantity of microorganisms in a wound. To perform a wound culture, a sample of tissue or fluid taken from the wound bed and placed in a sterile container for transportation to the laboratory. In the laboratory, the sample is placed in a substance that promotes growth of organisms and the type and quantity of organisms that grow are assessed by microscopy.[7] For details, see topic "Wound Culture - Swabs, Biopsies, Needle Aspiration".
- Susceptibility study: if upon wound culture pathogenic microorganisms are identified, a susceptibility study is performed at the laboratory by growing the pure bacterial isolate in the presence of varying concentrations of several antimicrobials and then examining the amount of growth to determine which antimicrobials at which concentrations inhibit the growth of the bacteria.[8] For details, see topic "Wound Culture - Swabs, Biopsies, Needle Aspiration".
Common types of specimen transport medium
- 10% buffered formalin: formalin is the saturated form of formaldehyde in water. It is both a fixative and a transport medium for transport of tissue to be analyzed for histopathology (e.g. H&E and other stains).
- Normal saline: saline is commonly used to transport tissue samples for bacterial or fungal tissue cultures. Viral cultures require a special viral transport media.[1]
- Michel's medium: Michel's medium is a transport medium for direct immunofluorescence.[9]
- Glutaraldehyde: used for specimens for electron microscopy.[1]
Care Setting
- Wound skin biopsies may be performed in several care settings including inpatient hospital, outpatient hospital, home health, skilled nursing facilities, provider's office, and others.
Scope of Practice for Collection of a Wound Biopsy Specimen
- Performing a wound biopsy is within the scope of several healthcare professionals including physicians, nurse practitioners, and physician assistants. In the U.S., nurses may be allowed to perform a punch or tangential skin biopsy, depending on each state's laws and regulations, local policies, and if other requirements are met (e.g. an order from a qualified healthcare provider/ licensed independent practitioner is present, size, location, patient age and risk profile).
- In the United States, an order should be obtained for diagnostic tests from the treating physician/nonphysician practitioner (as required by CFR, Title 42, Volume 2, Chapter IV, Part 410.32(a) Ordering diagnostic tests).[10]
WHEN TO PERFORM A WOUND BIOPSY
General Indications and Contraindications
Indications
Consider performing a wound biopsy for wounds present for more than 3 months, especially wounds that have not responded to the treatment of the suspected cause.[1] Wound biopsies are performed in order to [1]:
- Diagnose the etiology of a wound
- Rule out malignancy
- Obtain tissue for bacterial quantitative culture
Contraindications
Relative contraindications to wound biopsy include [1][4]:
- Blood disorders with the risk of uncontrollable bleeding
- Venous congestion and vascular wounds (e.g. arterial insufficiency) in a setting where resources are limited
HOW TO PERFORM A WOUND BIOPSY
Assessment
- Prior to performing a biopsy on a chronic wound, it is important that a comprehensive assessment be performed. See topics "How to Assess a Patient with Chronic Wounds" and "How to Determine Healability of a Chronic Wound".
- Specific attention should be given to [1]:
- Allergies, including those to topical antibiotics, antiseptics, local anesthetics, and tape or adhesives.
- Increased risk of bleeding during the procedure:
- Known bleeding disorders or previous history of excessive bleeding related to surgery or trauma: an electrocautery may be needed and/or sutures may be required after the specimen is removed to stop the bleeding.
- Medications that interfere with hemostasis (e.g., warfarin): patients should hold the medication on the day of or for a few days prior to the procedure.
- Smoking and use of corticosteroids have been associated with higher risk of local post-biopsy infection.[4]
Selection of the Biopsy Site, Technique and Transport Medium
Choosing the site, technique and transport for a skin biopsy is an important decision. In the process of planning biopsies, early involvement of your laboratory including pathology and microbiology is important so that the appropriate transport media can be immediately available. Optimal site, type of biopsy and transport medium for different conditions are summarized below and in Algorithm 1. [1][2]
- The biopsy specimen should include epidermis, dermis and subcutaneous tissue (except when the condition is confined to the epidermis and superficial dermis)
- For suspected cancerous lesions, the specimen should be taken from the wound edge via excisional biopsy or punch biopsy (if punch biopsy, multiple specimens may be needed) for H&E and for wound culture and susceptibilities (C&S) if signs of infection.
- For autoimmune vesicles, bulla, and pustules, the specimen should be taken via punch biopsy from the edge of a recent lesion (< 24h) for H&E and for C&S if signs of infection. Consider obtaining a specimen from normal-looking periwound for direct immunofluorescence.
- For vasculitis (small vessel), obtain a wound edge specimen from a 24-48h old lesion for H&E via punch biopsy, and a wound edge or periwound specimen from a new lesion (< 24h old) for direct immunofluorescence via punch biopsy. See topic "Cutaneous Vasculitis".
- For pyoderma gangrenosum, obtain a wound edge specimen from a recent lesion for H&E via incisional biopsy (preferable) or punch biopsy. Direct immunofluorescence findings are neither sensitive nor specific for pyoderma gangrenosum. Thus, it is suggested that direct immunofluorescence be conducted when additional findings require exclusion of immuno-bullous disease, lupus, or vasculitis as potential causes of cutaneous ulceration.[11] See topic " Pyoderma Gangrenosum - Introduction and Assessment".
- For infective ulcers, obtain a specimen from the center of the wound for C&S and H&E. For details on C&S, see topic "Wound Culture - Swabs, Biopsies, Needle Aspiration".
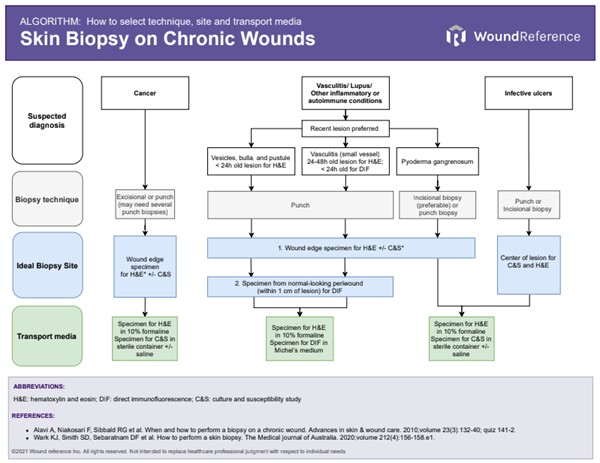
Algorithm: How to select skin biopsy technique, site and transport media (click to enlarge)
Procedure: Punch Biopsy of a Wound
After determining that a skin biopsy is indicated, clinicians may utilize the following steps shown in Tables 1-3 as a guide for performing a punch biopsy.[1][2]
Table 1. Pre-procedure
| Steps | Rationale/ Tips |
1. Confirm presence of an active order for wound culture by a qualified healthcare provider
| - This ensures compliance in settings where individuals who are not qualified by licensure to order the procedure have active orders to perform the procedure
|
2. If tissue specimen is collected for C&S, ensure that specimen can be taken to the laboratory within 24 hours
| - The International Wound Infection Institute suggests wound samples for C&S be transported to the microbiology laboratory within 4 hours.[7]
- For histopathology analysis, tissue will be fixed in 10% formalin right after collection so it not as time sensitive
- In the process of planning biopsies, early involvement of your laboratory including pathology and microbiology is important so that the appropriate transport media can be immediately available.
|
3. Ensure correct patient identity per protocol.
| - Facility policy will dictate how patient should be appropriately identified.
|
4. Inform and seek permission from patient to obtain specimen
| - By obtaining informed consent, the patient is aware of the purpose for the procedure, benefits, as well as the expected outcomes and potential complications.
|
5. Ensure adequate assistance, supplies, and equipment:
- 1 set of clean gloves, 1 set of sterile gloves
- Sterile saline
- Antiseptic agent, such as isopropyl alcohol, povidone-iodine, chlorhexidine
- Sterile gauze, cotton balls, and drapes
- Syringes with 22-gauge needle for draw-up and 30-gauge needle for injections
- Lidocaine 1% to 2% with epinephrine (without epinephrine if lesion on digits)
- Disposable punches: 3-, 4-, and 5-mm sizes (4-mm standard and a larger 5-mm punch for deeper biopsies, with the smaller 3-mm biopsy for the face)
- Forceps
- Scissors
- Hemostatic control supplies (e.g. electrocautery machine, silver nitrate, alginate, absorbable gelatin powder)
- Needle holder
- Suture material
- Specimen container
- 10% formalin specimen bottle with patient name and details
- Patient instructions for post-biopsy care
- Pathology requisition forms
- Appropriate supplies to redress the wound
- Confirm presence of informed consent, verbal or written per facility policy.
| - A sterile technique is used when performing a punch biopsy
|
Table 2. Procedure:
| Steps | Rationale/Tips |
1. Perform hand hygiene, and don clean gloves
|
|
2. Open supplies onto separate surface or tray, in an area independent of patient or clinician movement.
| - Use a no-touch technique to set up the supplies
- Tools should never be placed on an unstable surface, such as the patient; this could potentially cause injury.
|
3. Remove the soiled wound dressing, if present.
|
|
4. Cleanse the wound bed thoroughly with sterile saline.
| - Remove all superficial exudates and debris.
|
5. Remove gloves and perform hand hygiene. Put on sterile gloves.
| - A sterile technique is used when performing a punch biopsy
|
6. Prepare the biopsy site with an antiseptic
| - Antiseptics include isopropyl alcohol, povidone-iodine, chlorhexidine
|
7. If needed, mark the skin lesion with a skin marker before local anesthesia is injected
| - Some lesions become less apparent after local anesthetic injection
|
8. Inject local anesthetic and wait until area becomes anesthetized
| - To minimize pain while injecting anesthetic, inject anesthetic slowly
- Pinch injected area with forceps to test for numbness
|
9. Hold a 3- or 4-mm punch and rotate it approximately 180 degrees clockwise and then counterclockwise while it is being pushed into the skin until it enters the subcutaneous tissue
| - Avoid necrotic areas and debris
- Entrance of the punch in the subcutaneous tissue is felt as a loss of resistance.
- For areas with thick skin (e.g. upper back), it might be appropriate to push the punch instrument until its hub reaches the level of the skin. However, doing so in areas where the skin is thinner (e.g. dorsum of the hand) may lead to damage of underlying structures
|
10. With a pair of forceps, elevate the tissue to be removed so that the base can be exposed. Cut the specimen at its base (subcutaneous tissue) with a pair of scissors.
| - Avoid applying too much pressure on the tissue with the forceps, as this can crush the tissue and make diagnosis more difficult.
|
11. Perform hemostasis
| Hemostatic control can be achieved with an electrocautery, or by applying calcium alginate, absorbable gelatin powder, local pressure or a chemical cautery agent such as aluminum chloride or silver nitrate. |
12. Close the wound with non-absorbable simple interrupted sutures if needed.
| For sites on the face and neck, use a 5-0 nylon or polypropylene monofilament suture. Remove sutures in 7 days.For the trunk and extremities, use a 4-0 suture. Remove sutures in 10-14 days. |
Table 3. Post-procedure
| Steps | Rationale/Tips
|
1. Prepare the specimen for laboratory submission:- Place each specimen into separate bottles of 10% formalin solution.
- Label the specimen with the name of the patient, date and time of collection, and site of each specimen.
- If multiple specimens are obtained, number each sample. Record numbers and sites on the pathology requisition form.
- The requisition form should also contain:
- A brief and relevant clinical history
- Description of wound or lesion
| - Skin biopsy specimens processed for H&E should be transported in 10% formalin solution.
- For some suspected diagnoses, others special stains may be performed. Most of these stains are usually performed on formalin-fixed specimens
- For direct immunofluorescent studies, transport specimen in Michel's media.
- If infection is suspected, a separate specimen may be obtained for bacterial and/or fungal tissue culture and placed in a sterile container with or without normal saline.
- In practice, clinicians often obtain one punch biopsy specimen and split it in half for H&E and for C&S in a sterile fashion.
|
- Place the specimen in a biohazard transport bag and transport to the lab as soon as possible.
| Wrap the container with parafilm to prevent leakage.Double bag the specimen containerLabel the specimen with "Formaldehyde precaution" sticker. |
Documentation
Documentation should include:
- Wound assessment and characteristics, rationale for a biopsy (e.g. delayed wound healing despite adequate care, etc), purpose of the procedure (e.g. histopathological analysis)
- Documentation of the procedure: method, number of units, location, specimen removed (full-thickness, partial thickness).[6]
- Sampling of stratum corneum only, by any modality (eg, skin scraping, tape stripping) does not constitute a skin biopsy procedure and is not separately reportable.[5]
- Dermatopathology requisition form, microbiology request if submitting specimen for C&S. See topic "Wound Culture - Swabs, Biopsies, Needle Aspiration".
Video
Video 1. Punch biopsy on an atypical wound. By Scott Robinson, MD
CODING, COVERAGE, REIMBURSEMENT
Medicare Administrative Contractors and Local Coverage Determinations
Medicare coverage of provider and facility fees related to wound cultures is managed by Medicare Administrative Contractors (MAC), under Medicare Part A or Part B. Each jurisdiction may have its own specific local coverage determination and policies. See topic "Medicare Coverage Determinations for Wound Care".
CPT codes
Biopsy of Skin
- A specimen can be divided and sent for C&S and histopathological analysis. For a skin biopsy CPT to be used, the specimen needs to be sent for histopathological analysis.
- Biopsy of the skin is reported under three distinct techniques: tangential, punch, or incisional.[5]
- See CPT codes for skin and bone biopsies in the Appendix - CPT Codes.
Coding Tips
The use of a biopsy procedure code (eg, 11102, 11103, 11104, 11105, 11106, 11107) indicates that the procedure to obtain tissue solely for diagnostic histopathologic examination was performed independently, or was unrelated or distinct from other procedures/services provided at that time.[5]
Multiple Skin Biopsies On The Same Date
- When multiple biopsies are performed for the same patient on the same date, only one primary biopsy code may be reported, depending on the following [5][6]:
- If multiple biopsies are performed using the same technique, report the primary code (11102, 11104, 11106), then use the corresponding add-on code for the other biopsies.
- For instance, if an incisional biopsy is performed, report 11106 in combination with a tangential (11103), punch (11105), or incisional biopsy (11107) for the additional biopsy procedures.
- If multiple biopsies are performed using different techniques, report the primary code (11102, 11104, 11106), then use the add-on code that is specific to the other biopsies performed.
- When billing for these services, record the method and the number of units in your documentation. Although the location of the biopsy is not required to select a code, it should be document as well. An example of coding for multiple biopsies is shown in Table 4 below.
Table 4. Sample coding for multiple skin biopsies performed on the same date
| Procedures Performed | CPT Code(s) Reported |
2 tangential biopsies
| 11102 X 1, 11103 X 1
|
3 punch biopsies
| 11104 X 1, 11105 X 2
|
1 incisional biopsy, 1 tangential biopsy and 1 punch biopsy
| 11106 X 1, 11103 X 1, 11105 X 1 |
Skin Biopsy and Evaluation and Management (E/M) Services On The Same Date
- Do not report E/M level if the sole reason for the scheduled visit is to undergo a diagnostic or therapeutic test/service procedure. For further details see section 'Billing for evaluation and management and procedures on the same day' in topic "Coding and Billing Essentials in Wound Care"
- Payment for diagnostic (with the exception of pathology and laboratory) and/or therapeutic procedure(s) (code ranges 10040-69990, 70010-79999 and 90281-99140) already includes taking the patient’s blood pressure, temperature, asking the patient how he/she feels and getting the consent form signed. Since payment for these types of services is already included in the payment for the procedure, it is not appropriate to bill for an E/M service separately.
- However, there are circumstances when it is appropriate to report an E/M service code in addition to the procedures provided on the same date, provided the patient’s condition required a significant separately identifiable E/M service above and beyond the other service provided or beyond the usual preoperative and postoperative care associated with the procedure that was performed.
- Should a separately identifiable E/M service be provided on the same date that a diagnostic and/or therapeutic procedure(s) is performed, information substantiating the E/M service must be clearly documented in the patient’s medical record, to justify use of the modifier –25.
- The Current Procedural Terminology (CPT-4) manual gives the definition of modifier -25 as follows: “Significant, Separately Identifiable Evaluation and Management Service by the Same Physician on the Same Day of the Procedure or Other Service.”
- Example: a wound provider examines an established patient during a regularly scheduled follow up for a diabetic foot ulcer. During the patient’s exam, a new suspicious skin lesion on the leg is discovered. The physician determines this should be biopsied and performs a punch biopsy. In this scenario, the E/M would qualify as a separately identifiable service from the procedure of the biopsy. Report appropriate level E/M code with modifier 25 and procedure code (99213-25, 11100).
Multiple Procedures On The Same Date
- If two procedures are performed for the same condition on the same date, check the National Correct Coding Initiative (NCCI) edits and report only the one that is reportable per NCCI edits. See section 'National Correct Coding Initiative Edits (NCCI)' in topic "Coding and Billing Essentials in Wound Care".
- MACs implemented NCCI PTP edits within their claim processing systems and CMS incorporated PTP edits into the outpatient code editor (OCE) for OPPS. These edits are applied to outpatient hospital services and other facility services including, but not limited to, therapy providers (Part B Skilled nursing facilities (SNFs)), comprehensive outpatient rehabilitation facilities (CORFs), outpatient physical therapy and speech-language pathology providers (OPTs), and certain claims for home health agencies (HHAs) billing under TOBs 22X, 23X, 75X, 74X, 34X. [12]
APPENDIX
CPT Codes
Skin biopsy
Skin biopsy CPT codes [5]
| CPT Codes | Description |
11102
| Tangential biopsy of skin (e.g., shave, scoop, saucerize, curette), single lesion
|
+11103
| Each additional lesion
|
11104
| Punch biopsy of skin (including simple closure, when performed), single lesion
|
+11105
| Each additional lesion
|
11106
| Incisional biopsy of skin (e.g., wedge; including simple closure, when performed), single lesion
|
+11107
| Each additional lesion |
Bone biopsy
Bone biopsy CPT codes [5]
| CPT Codes | Description |
20220
| Biopsy, bone, trocar, or needle; superficial (eg, ilium, sternum, spinous process, ribs
|
20225
| Biopsy, bone, trocar, or needle; deep (eg, vertebral body, femur)
|
20240
| Biopsy, bone, open; superficial (eg, sternum, spinous process, rib, patella, olecranon process, calcaneus, tarsal, metatarsal, carpal, metacarpal, phalanx)
|
20245
| Biopsy, bone, open; deep (eg, humeral shaft, ischium, femoral shaft)
|